
imagem iso para estalar
Abra arquivos ISO diretamente no Windows Explorer.
softwar e informatica
As versões de teste do Windows 8 já
deram uma boa ideia de como o novo sistema operacional da Microsoft vai
funcionar. Desse modo, algumas ferramentas bastante simples, porém úteis, foram
adicionadas e devem facilitar a sua vida.
Com a opção “Montar”, disponível no Windows Explorer (WE) do
novo SO, é possível criar automaticamente uma unidade de disco virtual que pode
ler arquivos de imagem ISO. Essas imagens, normalmente criadas a partir de CDs
ou DVDs, necessitavam antigamente de um aplicativo exclusivo instalado no PC, o
que se tornou coisa obsoleta.
Primeira forma
Basicamente, existem duas maneiras muito simples de se
montar uma imagem ISO no WE. A primeira é utilizando o menu de contexto do
arquivo em questão.
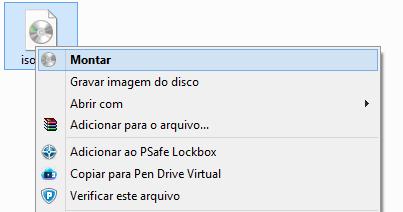
Para isso, encontre a imagem ISO que você deseja abrir e
clique nela com o botão direito do mouse. Em seguida, selecione a opção
“Montar” no menu de contexto.
Desse modo, você pode conferir todo o conteúdo presente no
arquivo sem gravá-lo em um CD/DVD ou instalar qualquer outra ferramenta no
computador.
Segunda Forma
Existe também uma alternativa para substituir o procedimento
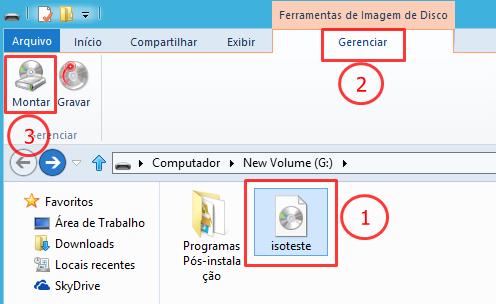
descrito acima. Assim, encontre o arquivo ISO que será usado e clique uma vez
no item a fim de apenas selecioná-lo. Agora, no WE, procure e clique na guia
“Gerenciar” e, em seguida, escolha a opção “Montar” no canto superior esquerdo
da janela.
Realizando qualquer um desses procedimentos, o WE deve abrir
uma janela mostrando o conteúdo da sua imagem ISO automaticamente. Fora isso, o
sistema também escolhe a próxima letra disponível para nomear a unidade
virtual. Dessa forma, se você já possui os discos "C" e
"D", a unidade ISO vai se tornar "E".
Alterando o nome da unidade
Contudo, para realizar alguns procedimentos, é preciso uma
letra específica na unidade de disco. Nesses casos, você pode mudar o nome
seguindo os próximos passos.
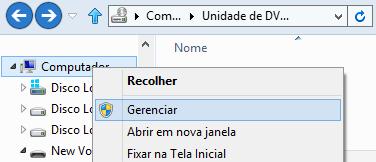
Primeiramente, procure o ícone do “Computador” no WE e
clique nele com o botão direito do mouse. Em seguida, escolha “Gerenciar”.
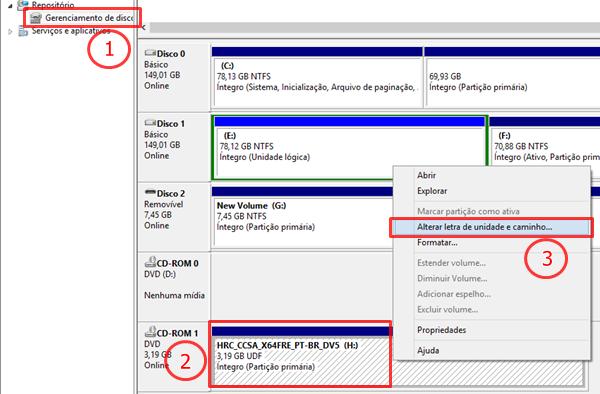
Agora, na barra lateral esquerda da janela aberta, selecione
“Gerenciamento de discos”. Depois disso, procure a unidade em questão na lista
que representa os discos conectados ao PC e clique nela com o botão direito.
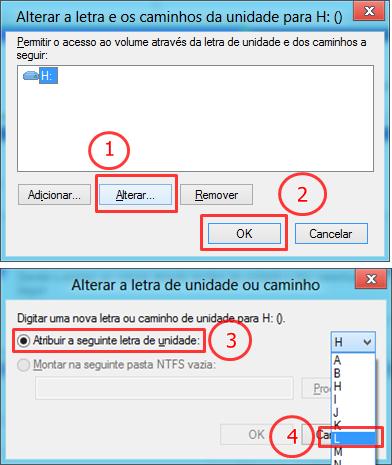
Agora, selecione “Alterar letra de unidade e caminho...”.
 AmpliarClique
no "+" para ampliar.
AmpliarClique
no "+" para ampliar.
Fazendo isso, uma pequena janela será exibida. Selecione
"Alterar" e depois confime em "OK". Logo após esta janela,
uma outra será mostrada. Nela, clique em “Atribuir a seguinte...” e, em
seguida, escolha a letra necessária.
Nota: esta funcionalidade é nativa apenas no Windows 8 e em suas
versões de teste. Desse modo, só é possível obter esses resultados no Windows 7
utilizando aplicativos como Daemon
Tools.
iso image to install
Open ISO files directly in Windows Explorer.
softwar and informatics
The test versions of Windows 8 already have a good idea of how the new Microsoft operating system will work. Thus, some very simple, yet useful tools have been added and should make your life easier.
With available in Windows Explorer (WE) of the new OS, "Mount" option you can automatically create a virtual disk drive that can read ISO image files. These images, usually created from CDs or DVDs required once an exclusive application installed on the PC, which became obsolete thing.
First form
Windows 8: How to mount ISO images
Basically, there are two very simple ways to mount an ISO image in WE. The first is using the context menu of the file in question.
To do this, find the one you want to open and click it with the right mouse button ISO image. Then select the "Build" option from the context menu.
Thus, you can check out all the content in this file without burning it to a CD / DVD or any other tool to install on your computer.
Second Form
There is also an alternative to replace the procedure described above. So, find the ISO file to be used and click once on the item to just select it. Now, in WE, browse to and click on "Manage" tab and then select the "Build" option in the upper left corner of the window.
Windows 8: How to mount ISO images
Performing any of these procedures, the WE should open a window showing the contents of your ISO image automatically. Otherwise, the system also selects the next available letter to name the virtual drive. Thus, if you already have the "C" and "D" drives the ISO unit will become "E".
Changing the device name
However, to perform some procedures, you need a specific letter in the disk drive. In such cases, you can change the name by following the next steps.
Windows 8: How to mount ISO images
First, look for the icon "Computer" in WE and click it with the right mouse button. Then choose "Manage".
Now, on the left sidebar of the open window, select "Disk Management". After that, look for the unit in question in the list that represents the disks connected to your PC and click it right. Now, select "Change Drive Letter and Paths ...".
Windows 8: How to mount images ISOAmpliarClique the "+" to enlarge.
By doing so, a small window appears. Select "Change" and then confime "OK". Soon after this window, another appears. In it, click "Assign the following ..." and then select the required letter.
Windows 8: How to mount ISO images
Note: this functionality is native only in Windows 8 and their trial versions. Thus, you can only get those results in Windows 7 using apps like Daemon Tools.
Nenhum comentário:
Postar um comentário