
Blender 3D e Adobe Premiere com Chroma Key
Você já tentou fazer uma
composição entre um vídeo real e uma animação criada em computador? Pelo menos
têm idéia de como é feito? Para fazer esse tipo de composição você precisa
utilizar uma técnica chamada de Chroma Key ou como algumas pessoas também
conhecem como Blue Screen. A técnica é muito simples e pode ser aplicada em
praticamente qualquer software de animação 3D.
O material que será gerado pelo software de animação, deve possuir um plano de fundo composto por uma cor sólida. Essa cor deve ser de preferência o verde ou o azul puro do RGB. No caso o verde com valores R=0, G=255, B=0 ou azul com valores R=0, G=0, B=255. Essas são as cores mais utilizadas, mas a princípio qualquer cor pode ser usada. Depois que a sua animação estiver pronta, um outro software responsável pela composição do vídeo com a animação remove o fundo colorido da animação.

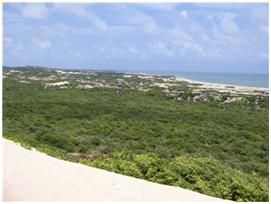
Quer ver um exemplo real de um
fundo verde para Chroma Key? Na Figura 01, estou em um Studio de TV que utiliza
um fundo verde para criar cenários virtuais.
Figura
01
(Sim,
sou eu…)
Vou mostrar aqui um exemplo de
composição feita com o Adobe Premiere e com o Blender
3D. Além do Premiere outros softwares também trabalham com
Chroma Key, como Final Cut, After Effects, Combustion, Shake e outros. Como
estou ministrando aulas sobre o Premiere, vou aproveitar um conteúdo que
utilizei em uma aula.


Have you tried doing a composition between a real and a video animation created on computer? At least have idea how is it done? To do this kind of makeup you need to use a technique called Chroma Key or as some people also know as Blue Screen . The technique is very simple and can be applied on virtually any 3D animation software .
The material that will be generated by the animation software , you must have a background composed of a solid color . This color should preferably be pure green or blue RGB. If the green values R = 0 , G = 255 , B = 0 or blue values R = 0 , G = 0, B = 255. These are the most used colors , but in principle any color can be used . Once your animation is ready, another software responsible for rendering the video with animation removes the colored background of the animation.
Want to see a real example of a green background for chroma key ? In Figure 01 , I'm in a TV Studio that uses a green background to create virtual scenarios .
Description : http://www.allanbrito.com/wp-content/uploads/2007/03/032207-2036-blender3dea1.jpgFigura 01
( Yes, I am ... )
I will show here an example of a composition made with Adobe Premiere and Blender 3D . Besides Premiere also work with other software Chroma Key , like Final Cut , After Effects , Combustion , Shake and others. As I am teaching classes on the Premiere , I enjoy content that I used in a class.
I'll use a real video and animation , with the goal of making a composition . See Figure 02 in the video image. Figure 03 shows the model used in 3D animation.
Description : http://www.allanbrito.com/wp-content/uploads/2007/03/032207-2036-blender3dea2.jpg
Figure 02
Description : http://www.allanbrito.com/wp-content/uploads/2007/03/032207-2036-blender3dea3.gif
Figure 03
The first step in preparing the environment should be done in Blender . I'll change the background color to green the environment . This change should be made in any 3D suite. See Figure 04 , I scored the background with a " pure " green in RGB mixing .
Description : http://www.allanbrito.com/wp-content/uploads/2007/03/032207-2036-blender3dea4.gif
Figure 04
With this configuration the result of rendering in Blender will be the same scene , but with a scenario with green background . An important detail here is try to match the lighting in both scenes . See Figure 05 a frame of this animation , rendered with green background .
Description : http://www.allanbrito.com/wp-content/uploads/2007/03/032207-2036-blender3dea5.gif
Figure 05
If the composition were prepared for a static image, the magic wand of gimp or photoshop solve the problem quickly ! But animation for a video editor is required . What is needed in Premiere ?
The first thing to do is open the Premiere and after setting up a project with the characteristics of our video , import the material for your project window . There all the elements that make up the assembly of a video sequence are stored .
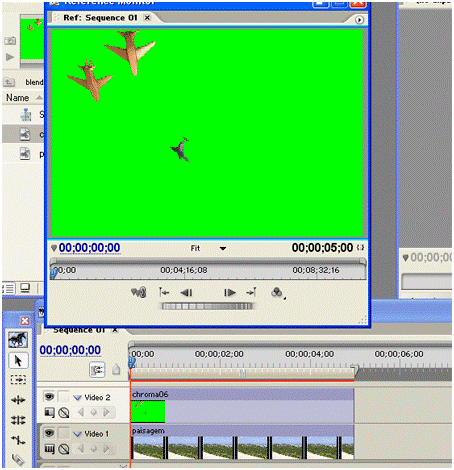
Once the files are in the Premiere project window , you can add both in the Timeline. The archive video shot should stay in a lower channel video and animation in Blender is generated in a more superior canal . In Figure 06 you can see that the files were placed on channels 1 and 2 respectively. So the animation will be positioned in front of the video shot .
Description : http://www.allanbrito.com/wp-content/uploads/2007/03/032207-2036-blender3dea6.gif
Figure 06
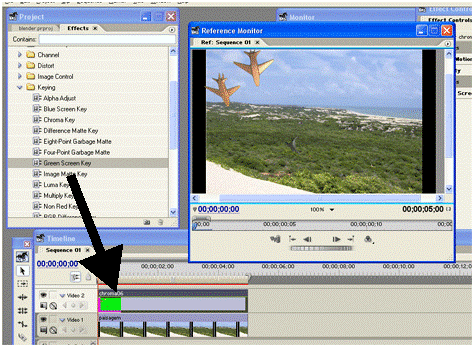
Now all we need to do is to add a video effect in portions of the animation. There are several effects available in Premiere in the Effects tab. All effects are separated by folders , as you can see in Figure 07 . Let's apply an effect located in the Keying folder , called Green Screen Key This effect is suitable for making green backgrounds with Chroma Key .
Description : http://www.allanbrito.com/wp-content/uploads/2007/03/032207-2036-blender3dea7.gif
Figure 07
Own in Figure 07 you can see that the green background was removed from the generated video animation. If necessary you can still do some adjustments in effect , that there is any defect with the removal of the background. Ideally, both videos are in high resolution so that there is no problem .
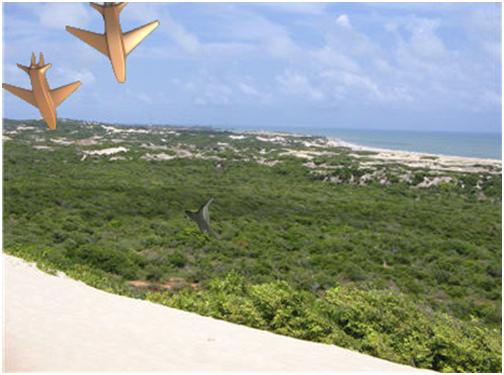
See the result of the assembly in Figure 08.
Description : http://www.allanbrito.com/wp-content/uploads/2007/03/032207-2036-blender3dea8.jpg
Figure 08
Now you know how the assembly and composition between two video files using Chroma Key This is made even need color correction and tweaking the lighting, but for the example of Chroma Key is enough.
As became clear in this tutorial you can integrate material produced in Blender with any software installation and video editing . Now just produce some videos to integrate real footage with 3D !
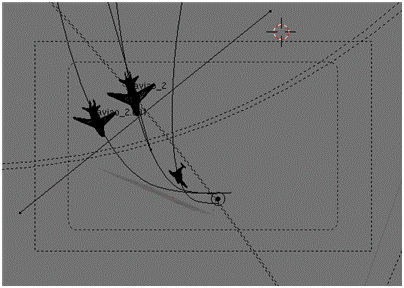
Vou utilizar um vídeo real e
uma animação, com o objetivo de fazer uma composição. Veja na Figura 02 uma
imagem do vídeo. A Figura 03 mostra o modelo 3D utilizado na animação.
Figura
02
Figura
03
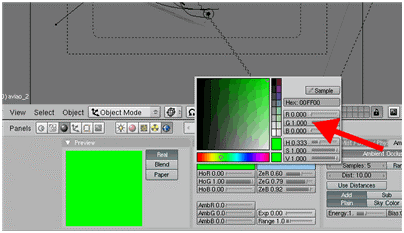
O primeiro passo na preparação
do ambiente deve ser feito no Blender. Vou alterar a cor de fundo do ambiente
para verde. Essa alteração deve ser feita em qualquer suíte 3D. Veja na Figura
04, que eu marquei o plano de fundo com um verde “puro” na mistura do RGB.
Figura
04
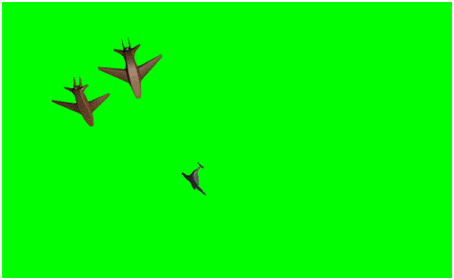
Com essa configuração o
resultado das renderizações no Blender será a mesma cena, mas com um cenário
com fundo verde. Um detalhe importante aqui é tentar combinar a iluminação de
ambas as cenas. Veja na Figura 05 um frame dessa animação, renderizada com
fundo verde.
Figura
05
Caso a composição fosse
preparada para uma imagem estática, a varinha mágica do gimp ou do photoshop resolveria
o problema de maneira rápida! Mas para animação é necessário um editor de
vídeo. O que é necessário fazer no Premiere?
A primeira coisa a fazer é
abrir o Premiere e depois de configurar um projeto, com as características do
nosso vídeo, importar o material para a sua janela do projeto. Lá são
armazenados todos os elementos que compõe a montagem de uma sequência de vídeo.
Depois que os arquivos
estiverem na janela de projeto do Premiere, podemos adicionar ambos na
Timeline. O Arquivo de vídeo filmado deve ficar em um canal de vídeo mais
inferior e a animação gerada no Blender fica em um canal mais superior. Na
Figura 06 é possível perceber que os arquivos foram posicionados nos canais 1 e
2 respectivamente. Assim a animação ficará posicionada na frente do vídeo
filmado.
Figura
06
Agora tudo que precisamos fazer
é adicionar um efeito de vídeo no trecho da animação. Existem vários efeitos
disponíveis no Premiere na aba Effects. Todos os efeitos estão separados por
pastas, como é possível perceber na Figura 07. Vamos aplicar um efeitos que
está localizado na pasta Keying, chamado de Green Screen Key. Esse efeito é
próprio para fazer Chroma Key com fundos verdes.
Figura
07
Na própria Figura 07 é possível
perceber que o fundo verde foi removido do vídeo gerado pela animação. Caso
seja necessário é possível ainda realizar alguns ajustes no efeito, para que
não exista nenhum tipo de defeito com a remoção do fundo. O ideal é que ambos
os vídeos estejam em alta resolução para que não exista nenhum problema.
Veja o resultado da montagem na
Figura 08.
Figura
08
Agora você já sabe como é feita
a montagem e composição entre dois arquivos de vídeo usando Chroma Key. A
imagem ainda precisaria de correção de cor e alguns ajustes na iluminação, mas
para o exemplo do Chroma Key está suficiente.
Como ficou claro nesse tutorial
é possível integrar material produzido no Blender com qualquer software de
montagem e edição de vídeo. Agora é só produzir alguns vídeos para integrar
filmagens reais com 3D!
Blender 3D and Adobe Premiere with Chroma Key
Have you tried doing a composition between a real and a video animation created on computer? At least have idea how is it done? To do this kind of makeup you need to use a technique called Chroma Key or as some people also know as Blue Screen . The technique is very simple and can be applied on virtually any 3D animation software .
The material that will be generated by the animation software , you must have a background composed of a solid color . This color should preferably be pure green or blue RGB. If the green values R = 0 , G = 255 , B = 0 or blue values R = 0 , G = 0, B = 255. These are the most used colors , but in principle any color can be used . Once your animation is ready, another software responsible for rendering the video with animation removes the colored background of the animation.
Want to see a real example of a green background for chroma key ? In Figure 01 , I'm in a TV Studio that uses a green background to create virtual scenarios .
Description : http://www.allanbrito.com/wp-content/uploads/2007/03/032207-2036-blender3dea1.jpgFigura 01
( Yes, I am ... )
I will show here an example of a composition made with Adobe Premiere and Blender 3D . Besides Premiere also work with other software Chroma Key , like Final Cut , After Effects , Combustion , Shake and others. As I am teaching classes on the Premiere , I enjoy content that I used in a class.
I'll use a real video and animation , with the goal of making a composition . See Figure 02 in the video image. Figure 03 shows the model used in 3D animation.
Description : http://www.allanbrito.com/wp-content/uploads/2007/03/032207-2036-blender3dea2.jpg
Figure 02
Description : http://www.allanbrito.com/wp-content/uploads/2007/03/032207-2036-blender3dea3.gif
Figure 03
The first step in preparing the environment should be done in Blender . I'll change the background color to green the environment . This change should be made in any 3D suite. See Figure 04 , I scored the background with a " pure " green in RGB mixing .
Description : http://www.allanbrito.com/wp-content/uploads/2007/03/032207-2036-blender3dea4.gif
Figure 04
With this configuration the result of rendering in Blender will be the same scene , but with a scenario with green background . An important detail here is try to match the lighting in both scenes . See Figure 05 a frame of this animation , rendered with green background .
Description : http://www.allanbrito.com/wp-content/uploads/2007/03/032207-2036-blender3dea5.gif
Figure 05
If the composition were prepared for a static image, the magic wand of gimp or photoshop solve the problem quickly ! But animation for a video editor is required . What is needed in Premiere ?
The first thing to do is open the Premiere and after setting up a project with the characteristics of our video , import the material for your project window . There all the elements that make up the assembly of a video sequence are stored .
Once the files are in the Premiere project window , you can add both in the Timeline. The archive video shot should stay in a lower channel video and animation in Blender is generated in a more superior canal . In Figure 06 you can see that the files were placed on channels 1 and 2 respectively. So the animation will be positioned in front of the video shot .
Description : http://www.allanbrito.com/wp-content/uploads/2007/03/032207-2036-blender3dea6.gif
Figure 06
Now all we need to do is to add a video effect in portions of the animation. There are several effects available in Premiere in the Effects tab. All effects are separated by folders , as you can see in Figure 07 . Let's apply an effect located in the Keying folder , called Green Screen Key This effect is suitable for making green backgrounds with Chroma Key .
Description : http://www.allanbrito.com/wp-content/uploads/2007/03/032207-2036-blender3dea7.gif
Figure 07
Own in Figure 07 you can see that the green background was removed from the generated video animation. If necessary you can still do some adjustments in effect , that there is any defect with the removal of the background. Ideally, both videos are in high resolution so that there is no problem .
See the result of the assembly in Figure 08.
Description : http://www.allanbrito.com/wp-content/uploads/2007/03/032207-2036-blender3dea8.jpg
Figure 08
Now you know how the assembly and composition between two video files using Chroma Key This is made even need color correction and tweaking the lighting, but for the example of Chroma Key is enough.
As became clear in this tutorial you can integrate material produced in Blender with any software installation and video editing . Now just produce some videos to integrate real footage with 3D !
Nenhum comentário:
Postar um comentário